6. Admin Panel
In the previous step you added CRUD actions with @cfast/actions and permission-aware UI with @cfast/ui. Each route was hand-coded: a loader that queries the database, a component that renders the data, and actions wired to buttons.
That works well for public-facing pages where the UI is custom. But every app also needs an admin panel, and the admin panel is always the same structure: a table list, a detail view, a create form, an edit form, user management. The only thing that changes is the schema.
@cfast/admin automates that. It reads your Drizzle schema, generates configuration for @cfast/ui components, and gives you a complete admin panel in one route.
What you will build
Section titled “What you will build”By the end of this step, your blog will have:
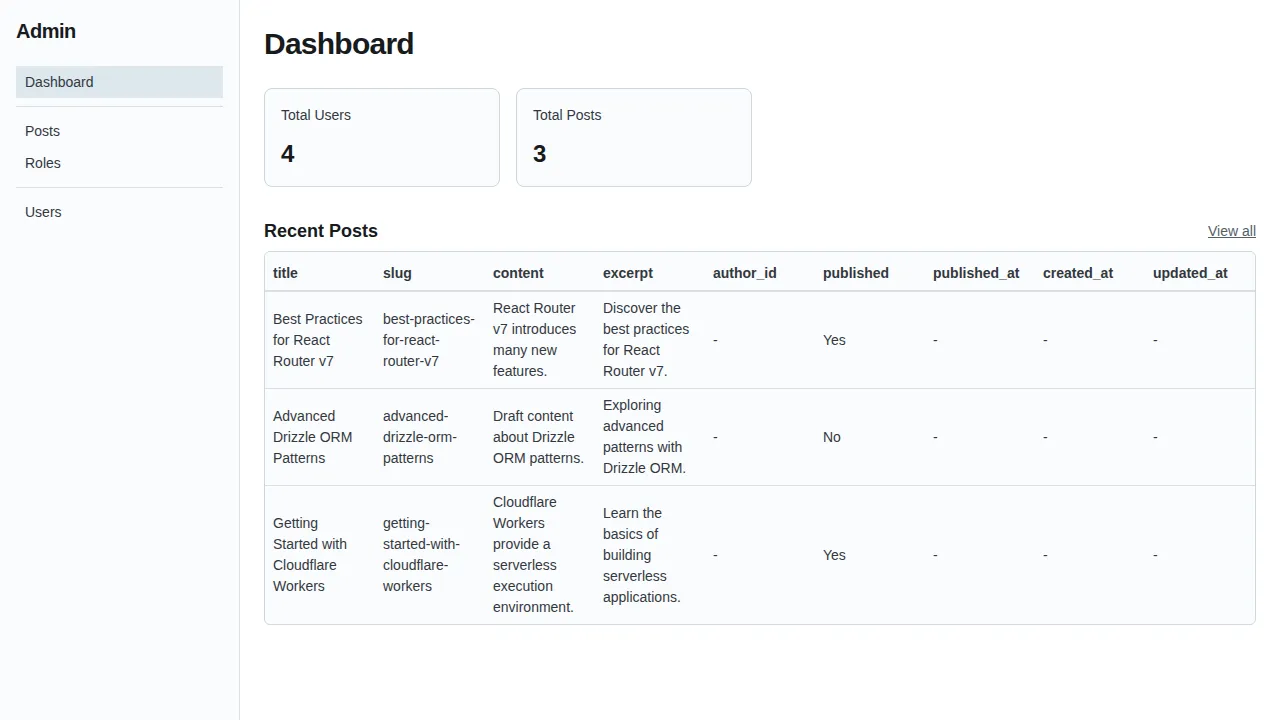
- An
/adminroute with a full CRUD panel for posts, users, and roles - A dashboard with record counts and recent activity
- User management with role assignment
- All of it respecting your existing permission system
Install the package
Section titled “Install the package”pnpm add @cfast/adminThe admin architecture
Section titled “The admin architecture”@cfast/admin is a thin layer that does two things:
- Schema introspection --- reads your Drizzle tables to generate configuration: which columns to show, which fields to use in forms, which actions to offer
- Configuration to UI --- passes that configuration to
@cfast/uicomponents for rendering
The admin panel is not a separate app. It is a React Router route that uses the same database, same permissions, and same auth as the rest of your application. An editor who opens the admin sees editor-level data. The permission system is not bypassed.
Create the admin server module
Section titled “Create the admin server module”The server module provides the auth adapter and database factory that @cfast/admin needs:
import { createAdminLoader, createAdminAction, introspectSchema } from "@cfast/admin";import type { AdminAuthConfig, AdminUser } from "@cfast/admin";import { createDb } from "@cfast/db";import type { DbConfig } from "@cfast/db";import { requireAuthContext, hasRole } from "~/auth.helpers.server";import { initAuth } from "~/auth.setup.server";import { env } from "~/env";import * as schema from "~/db/schema";
const auth: AdminAuthConfig = {  async requireUser(request: Request) {    const ctx = await requireAuthContext(request);    const user: AdminUser = {      id: ctx.user.id,      email: ctx.user.email,      name: ctx.user.name,      avatarUrl: ctx.user.avatarUrl,      roles: ctx.user.roles,    };    return { user, grants: ctx.grants };  },
  hasRole(user: AdminUser, role: string) {    return hasRole(      user as Parameters<typeof hasRole>[0],      role as Parameters<typeof hasRole>[1],    );  },
  async getRoles(userId: string) {    const e = env.get();    const authInstance = initAuth({ d1: e.DB, appUrl: e.APP_URL });    return authInstance.getRoles(userId);  },
  async setRole(userId: string, role: string) {    const e = env.get();    const authInstance = initAuth({ d1: e.DB, appUrl: e.APP_URL });    await authInstance.setRole(userId, role);  },
  async removeRole(userId: string, role: string) {    const e = env.get();    const authInstance = initAuth({ d1: e.DB, appUrl: e.APP_URL });    await authInstance.removeRole(userId, role);  },
  async setRoles(userId: string, roles: string[]) {    const e = env.get();    const authInstance = initAuth({ d1: e.DB, appUrl: e.APP_URL });    await authInstance.setRoles(userId, roles);  },};
function createDbForAdmin(grants: unknown[], user: { id: string } | null) {  const e = env.get();  return createDb({    d1: e.DB,    schema: schema as unknown as DbConfig["schema"],    grants: grants as Parameters<typeof createDb>[0]["grants"],    user,    cache: false,  });}
const adminConfig = {  db: createDbForAdmin,  auth,  schema: {    users: schema.users,    posts: schema.posts,    roles: schema.roles,  },  users: {    assignableRoles: ["admin", "editor", "reader"],  },  dashboard: {    widgets: [      { type: "count" as const, table: "users", label: "Total Users" },      { type: "count" as const, table: "posts", label: "Total Posts" },      { type: "recent" as const, table: "posts", label: "Recent Posts", limit: 5 },    ],  },  requiredRole: "admin",};
const tableMetas = introspectSchema(adminConfig.schema);
export const adminLoader = createAdminLoader(adminConfig, tableMetas);export const adminAction = createAdminAction(adminConfig, tableMetas);
There is a lot of code in the auth adapter, but most of it is bridging your existing auth helpers to the interface @cfast/admin expects. The key pieces are:
requireUser--- authenticates the request and returns user + grantshasRole/getRoles/setRole--- role management operationsdb--- a factory that creates a permission-checked database client per requestschema--- which tables to include in the admin panel (auth-internal tables likesessionsandverificationsare excluded)requiredRole--- only users with this role can access the admin
Create the admin route
Section titled “Create the admin route”The route file is minimal. It imports the server-side loader and action, and creates a client-safe component from schema introspection:
import type { LoaderFunctionArgs, ActionFunctionArgs } from "react-router";import { adminLoader, adminAction } from "~/admin.server";import { createAdminComponent, introspectSchema } from "@cfast/admin";import * as schema from "~/db/schema";
const tableMetas = introspectSchema({  users: schema.users,  posts: schema.posts,  roles: schema.roles,});
const AdminComponent = createAdminComponent(tableMetas);
export async function loader({ request }: LoaderFunctionArgs) {  return adminLoader(request);}
export async function action({ request }: ActionFunctionArgs) {  return adminAction(request);}
export default AdminComponent;
Notice the server/client split:
introspectSchemaruns at build time to extract column metadata --- this is safe for the client bundle because it only contains table structure, not dataadminLoaderandadminActionare server-only --- they access the database and auth systemAdminComponentrenders using@cfast/uicomponents, driven by the introspected metadata
Register the route
Section titled “Register the route”Add the admin route to your routes configuration:
import { type RouteConfig, index, route } from "@react-router/dev/routes";
export default [  index("routes/home.tsx"),  route("login", "routes/login.tsx"),  route("api/auth/*", "routes/auth.$.tsx"),  route("posts", "routes/posts/index.tsx"),  route("posts/new", "routes/posts/new.tsx"),  route("posts/:id", "routes/posts/$id.tsx"),  route("admin", "routes/admin.tsx"),] satisfies RouteConfig;
What the admin gives you
Section titled “What the admin gives you”With that one route, you get:
| Feature | How it works |
|---|---|
| Dashboard | Record counts and recent items from the widget config |
| Table list views | Sortable, searchable tables for posts, users, roles |
| Detail views | Read-only detail pages for each record |
| Create/edit forms | Auto-generated from Drizzle schema via @cfast/forms |
| User management | Role assignment panel, user search |
| Permission-aware | All CRUD operations go through @cfast/db --- the admin does not bypass your permission system |
Customizing table display
Section titled “Customizing table display”You can control which columns appear in list views and how tables are labeled:
const adminConfig = { // ... tables: { posts: { label: "Blog Posts", listColumns: ["title", "published", "createdAt"], searchable: ["title", "content"], defaultSort: { column: "createdAt", direction: "desc" }, fields: { content: { component: RichTextEditor }, }, }, },};Tables not listed in the tables config use sensible defaults derived from the schema.
Why separate server and client?
Section titled “Why separate server and client?”React Router on Workers bundles server and client code separately. Server-only imports (like your database client, auth instance, and env bindings) must not end up in the client bundle.
The split works like this:
admin.server.tsimportscreateDb,requireAuthContext,env--- all server-onlyroutes/admin.tsximports onlyintrospectSchema,createAdminComponent(schema metadata + React components), and the server functions via.serverconvention
This pattern is important. If you import createDb directly in your route file, the Workers bundler will try to include it in the client, causing build failures.
Try it out
Section titled “Try it out”pnpm dev- Sign in as an admin
- Navigate to
/admin - You should see a dashboard with user and post counts
- Click on “Posts” in the sidebar to see the list view
- Click on a post to see the detail view
- Try creating and editing records
- Navigate to the Users section and assign roles
What is next
Section titled “What is next”Your blog now has a full admin panel. In the next step, you will add file storage for post cover images using Cloudflare R2 and @cfast/storage.